
This Tutorial Will Teach You To Strum in 20 Minutes
When I was a teenager teaching myself guitar in the 1980’s, the web didn’t exist. Googling wasn’t something you did on the computer—you did it with your eyes, at the girl who sat across from you in Chemistry. So when I had a question about guitar technique, I had to ask a friend who played guitar, research my mom’s ancient guitar instruction book, or sift through my guitar magazines to try to find the answer.
Now the internet is my primary guitar teacher. Whenever I have a question, the first place I go is a search engine. I find online videos, download free tabs, improvise over streaming jam tracks, and preview new music on iTunes.
The internet is especially great for an advanced guitarist. But one thing that’s often left out of free guitar lesson websites is proper instruction on strumming, even though this is the first hurdle most beginners face: Strumming a song start to finish.
One reason for this may be that it’s easier to learn strumming face-to-face with a teacher. Many students can simply watch and listen while a teacher strums, and pick up on the groove by imitating. But strumming can be described in writing. Over the eight years I’ve been teaching guitar, I’ve developed a system of writing strum patterns that anyone can learn to read easily, even if they’ve never had previous musical training.
If you enjoy this tutorial, I recommend signing up for my strum pattern videos. They’ll give you access to 155 high-quality videos (much better than the ones in this tutorial) that will show you how to strum most of the songs on my site.
Pickin’ the Pick
Unless you’re into old-time country or folk music, you’ll probably want to strum with a pick. Sometimes you’ll hear contemporary artists like John Mayer and Jack Johnson strum with their fingers if they want to alternate between strumming and fingerpicking, or if they want the muted, warm sound of fingers brushing strings. But 99% of acoustic guitar strummers like the crisp, bright sound of a pick.
Picks come in different shapes and thicknesses. Start with the normal shape:
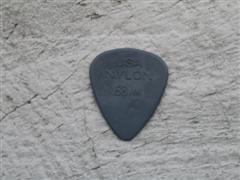
Buy some thin- and medium- thickness picks. The thin ones are easier to use, but many guitarists don’t like their loud attack (the click of the pick hitting the strings). You can switch to mediums once you’ve learned the basics.
Heavy picks are for high-speed-guitar-solo types, so steer clear for now.
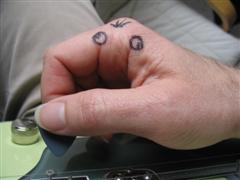
Holdin’ the Pick
Up until a few years ago, I held my pick between my thumb and the pads of my index and middle fingertips. It seemed the easiest way to keep the pick from falling out of my hand when I was strumming U2’s “Desire” and The Who’s “Pinball Wizard”. A few guitarists like Steve Howe hold their picks like that, but most hold it like this, with the pick between the thumb and the side of the index finger:
I think this grip gives you more control when you’re trying to pick individual strings. Since many songs require both picking and strumming, learn this first. If you want to switch to the Steve Howe grip later for strumming-only songs, go for it.
Guitar instruction books often show the pick being gripped with fingers curled into a tighter fist than in the photo above. But when I curl my fingers tighter, with the last joint of the index finger parallel with the thumb, it’s hard to let the pick flex in my fingers. It’s hard to strum lightly, and I drop my pick a lot. So one adjustment I’ve made is to extend my index finger a bit down the length of the pick like so:
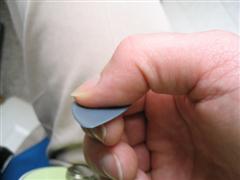
See how my index finger is pointing less toward my palm and more toward you? This grip gives me more skin in contact with the pick for a more solid, but more gentle grip. I can let the pick flex in my fingers as I strum without dropping it. It also means that I sometimes hit the strings with the side of my index fingernail, and so the nail never grows out on that side. I still have enough nail for fingerpicking, but it’s ruined my career as a hand model on the Home Shopping Network. Darn!
Strummin’ With the Pick
The main thing you need to remember here is to keep your strumming arm going in a constant up-down motion, whether or not you’re hitting the strings. This acts as a metronome, helping you to stay in the groove of the song.
Exercise 1
Let’s practice that principle by strumming all downstrokes, one strum per beat. But before we start, let’s take a look at how I write strum patterns:
D   D   D   D
1 + 2 + 3 + 4 +
The lower line is the beats (the numbers) of the measure with the upbeats (the plus signs) in between. The upper line shows where you strum–D’s are downstrums, and U’s are upstrums. As you strum, you can count along by saying “one-and-two-and-three-and-four-and.” Move your arm down on the numbers and up on the “and’s”. In this first exercise, strum the strings on all downstrokes. When you get to the end of the measure (four beats), start over immediately. Go for it!
Exercise 2
Now let’s try all down and upstrokes:
D U D U D U D U
1 + 2 + 3 + 4 +
Here are some things to keep in mind:
- Strum from the elbow. Your wrist should be relaxed, but not moving very much. Most of the strumming motion comes from flexing your elbow.
- Keep the pick perpendicular to the strings.Often beginners will tilt the pick up on downstrokes and down on upstrokes so that the pick doesn’t get “caught” on the strings. The problem is, all that tilting is impossible once you start strumming more quickly, and can produce an uneven sound. Learning how to strum evenly takes time, but you can help things by gripping the pick lightly.
- Strum with a wide arc. Beginners tend to just barely pass over the strings as they strum. This can cause the strumming to sound choppy, where you can hear individual strings being struck. Instead, you want to hear all the strings being struck almost simultaneously, in a burst of sound. Strumming in a wide arc will increase the speed that your pick passes over the strings. It’s also harder to aim properly when you do this, but you’ll get it!
If you’re digging this tutorial, you’ll love my strum pattern videos. Just $7/month will give you access to 155 high-quality videos (much better than the ones in this tutorial) that will show you how to strum most of the songs on my site.
Exercise 3
Next I want you to practice using your arm as a metronome, keeping it moving up and down even when you’re not strumming. Here’s the pattern:
D
1 + 2 + 3 + 4 +
If this were really a guitar part in a song played by an experience guitarist, he or she probably wouldn’t be moving their arm that much–it does look a bit silly–but they would almost certainly be doing something with their body to keep in rhythm: Tapping their foot, bobbing their head, doing the Elvis knee-jerk, whatever.
Exercise 4
Now you’re strumming twice per measure. Keep that arm moving!
D       D
1 + 2 + 3 + 4 +
Exercise 5
OK, here’s the first part of the folk strum pattern. Can’t you feel the excitement mounting?
D   D U
1 + 2 + 3 + 4 +
In this video I introduce a new way of using your voice to help you strum. So far we’ve been counting “one-and-two-and-three-and-four-and.” But as strum patterns get more complex, I find it’s easier to say the “down’s” and “up’s” as you’re strumming them. This one isn’t that hard, but the next one is….
Exercise 6
This pattern is the most syncopated one so far. Syncopated music stresses upbeats, and this pattern has two upstrums in a row. Syncopated music is hard to play, but without it, funk granddaddy George Clinton would have been a tuba player in a polka band.
D   D U   U
1 + 2 + 3 + 4 +
You’ll notice that I say “rest” on the 4th beat. I find this helps to remind you that you need to move your arm down on the 4th beat (even though you’re not strumming).
Exercise 7
Here it is, the holy grail of beginning strumming, the Folk Strum Pattern:
D   D U   U D U
1 + 2 + 3 + 4 +
The other patterns in these exercises were merely warm-ups. The Folk Strum Pattern, on the other hand, is used in a ton of songs, so keep working on it until you can play it in your sleep. Try it with Bob Dylan’s “Blowin’ in the Wind,” Buffalo Springfield’s “For What It’s Worth,” or if you want something less folksy, how about Nirvana’s “Come as You Are?”
(See video of me doing my best Kurt Cobain).
I hope you enjoyed this tutorial. Did I mention that my strum pattern videos are a great next step in your strumming education? They’ll show you how to strum most of the songs on my site, using high-quality videos like the Folk Strum video you watched.
Let me know how you liked the lesson and please tell me if anything wasn’t clear.