

For most of my guitar playing career, I've schlepped my stompboxes and cables in a paper bag like some digital-age hobo. But last spring, a local singer-songwriter Jill Cohn asked me to join her band, and I decided to upgrade to a rig that would make it easier to get to rehearsals and gigs, and frankly, looked a little less ghetto.
I looked into buying a pre-fab pedalboard, but decided that they cost too much, are overbuilt, and don't have enough room. It's not like I need one of those bombproof flightcase jobbies---maybe if I were gigging three times a week instead of once a month.
All I needed was a way to transport all my pedals without having to set them up and break them down every trip. Also, I'd shelved some of my effects---a wah, a volume pedal---because I couldn't be bothered to fool with them whenever I wanted to move my rig. The pedalboard would finally give me the excuse to dust off those really useful effects and integrate them permanently into my signal chain.
One major change I made when I decided to build a pedalboard was to invest in a switching system. I'd gotten tired of doing a frantic tap-dance routine whenever I needed to switch more than one effect at a time. A switching system enables you to program what combinations of effects you typically use, and assign those combinations to individual switches. Also, effects that aren't being used are left out of the signal chain, which means they won't suck tone out of your signal. SWEET!
So the following are instructions for building an awesome, pro-quality switch-system pedalboard, using the best materials and construction with the least amount of effort. I kept cost down where I could, but I didn't skimp on electronics. I spend too much time playing to want anything less than awesome-sounding gear.
The only part that took time and skill (mostly time) was soldering custom-length guitar cables, which was a blast but is by no means necessary if you're averse to soldering. Having used my pedalboard for a year now, I wouldn't do anything differently. Note, however, that this pedalboard will not protect your pedals at all. I feel fine just putting it on the back seat of my car, but I wouldn't put it in the back of a van next to a Marshall stack, ready to topple onto my $250 fuzz pedal.
Step 1: What size?
First, you need to decide how much stuff you want on your pedalboard. If you're a seasoned electric guitar player, you probably know what you like. But most people reading this article are probably still assembling their arsenal, learning what sounds they like, and developing their own distinctive sound. So before you build your pedalboard, peer into the future. Consider that most guitarists use AT LEAST the following three items:
Distortion
Volume
Power supply
While most electric guitarists building a pedalboard own a distortion pedal, I would guess that many do not own either a volume pedal or a single power supply that will fuel all your pedals. Volume pedals are practically worthless when you're practicing by yourself (unless you're into volume swells), but they're indispensable for hands-free control of your volume when you're jamming or performing with a band. And power supplies are better for the environment (less 9V batteries in the landfill) and will ensure that you never get caught on stage with a dead stompbox. If you don't have a volume pedal or power supply, consider getting them, or at least making space for them, on your pedalboard. If you don't get a power supply, leave room for a power strip.
Lay all your pedals out on the floor and arrange them into a rectangle. Make sure that expression pedals (wah, volume) and your switching system (if you use one) are in front for easy access, of course. Leave room for cable jacks and power supply jacks to poke out of the sides of your pedals (think about whether you'll be using straight plugs or right-angle---in most cases, right-angles are the way to go). And if there's any chance Santa might bring you a fab new fuzz pedal in the next five years, leave room for a couple unforseen additions.
You'll want to, as much as possible, line up your pedals in the order that you want your guitar signal to pass through them, called the "signal chain." This is less critical if you're using a loop-based switching system, but otherwise, people typically make a sideways U-shaped path through the two rows of pedals. There's been lots written on which order is best. Google "guitar signal chain," or here's a good guide.
Measure the dimensions of your pedal arrangement. This will be the size of your pedalboard.
Step 2: Building the Board
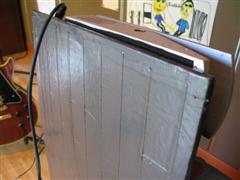
Your pedalboard doesn't need to be made of tank armor to be durable. 1/4" plywood works just fine, and when you've got 20 lbs. of electronics stuck to it and you're lugging it three city blocks to your friend's house to rehearse, you'll be glad you got the thin stuff. One thing to consider is that tape and velcro will stick better to smooth surfaces than rough, so invest in the fairly high-grade plywood. I went to Home Depot and had some kid cut my wood for me because the service was free, I'm lazy, and I gave up my dream of being a DIY ninja long ago.
I spent way too much time trying to figure out how to protect my plywood from getting all bashed up--I even considered covering it in tolex, the material that covers guitar amps--before I realized I could just use duct tape. Of course! Not only would duct tape prevent the edges from splintering, but its rubbery surface would grip smooth floors, it's cheap and easy, and most importantly, one should abide by this fundamental law of nature: Always use duct tape when given the opportunity.
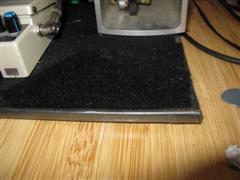
Another thing to consider was how to attach the pedals to the board. Some meticulous folks who don't want to desecrate their vintage gear strap their pedals to the board, but most people use velcro. 3M Dual-Lock is the running favorite, but I couldn't find it at the store, so I took a risk and got Velcro-brand Industrial Strength that came in a 15' x 2" roll. My worry was unfounded. This stuff uses the same adhesive that Peter Parker has in his spider web formula. It's never coming off. Because the velcro adhesive is more solid than the duct tape adhesive, I covered only the bottom and edges of the pedalboard with duct tape, leaving all but about a 1-inch perimeter of the top of the board bare, so that the velcro would adhere directly to the wood instead of to duct tape, and only barely overlap the duct tape to look nice and keep the duct tape from peeling. I suppose if you're having trouble with adhesion, painting the plywood first would provide a better surface.
Here are the steps I took::
 1. Sand rough edges of plywood.
2. Wipe down with damp cloth to remove all sawdust and let dry.
3. Cover bottom of pedalboard with duct tape. Choose the rough side of the plywood if there is one---you'll want the velcro to bond to the smoothest side. Lay down strips of tape so that each edge overlaps the next, and make the strips long enough so that the ends wrap around the edge of the board and extend about an inch onto the top of the board.
 4. Tape edges of board with duct tape by running long strips of tape along the length of the edge so that equal amounts of tape overlap the top and bottom of the board. At each of the corners, I cut slits in the tape where it made a bend so that instead of making a fold, the extra tape overlapped and lay flat.
5. Cover top of pedalboard with "loop" velcro (the fuzzy side). Make strips long enough so that the ends overlap the edges of the duct tape (to keep it from peeling off), and lay them down side by side. Easier said than done, but you'll get the hang of it.
 Step 3: Sticking the Pedals to the Board
This part's technically easy, but about as much fun as putting down a lame horse if you're as attached to your effects pedals as I am. See, in order to attach the "hook" velcro to your pedals, you've got to peel the rubber off their base. I know I'm a sentimental sap, but it was tough ripping apart the BOSS DD-3 I'd gotten for my 16th Christmas. Charlie Bucket has his golden ticket, Citizen Kane has his Rosebud, Ralphie Parker has his official Red Ryder carbine-action 200-shot range model air rifle with a compass in the stock, and I have my DD-3. Like a band aid, it's best done quickly.
Scrape all the residue off the base and stick a rectangle of "hook" velcro on.
Step 4: Connecting With Cables
If you're not using a switching system, you can probably get away with just using store-bought patch cables (medium or high quality). Make sure they've got right-angle plugs so that they don't take up too much space. If you are using a switching system, or have a pedal arrangement that requires cables of many different lengths, you'll need to make custom cables.
The quick and easy way to do this is to buy a solderless cable kit like the Core X2 DIY Cable Kit. Here's a video that shows the process.
The more time-consuming way is to solder your own. After a lot of poking around, I went with the advice of a fella named Lord Valve, mostly because of his name, and because he recommended using hot glue, which is almost as much fun as duct tape. Soldering all the cables for my board took about 12 hours, but it was fun knowing I was probably making the most awesome patch cables in the universe.
Here are Lord Valve's instructions:
For guys what rolls their own, here's the best combo I've found: Canare GS-6 cable and Switchcraft 280 plugs. I know the temptation is to use the snazzy-looking Neutrik plugs; they are hard to solder to without a *really* powerful iron, and the strain relief system is bogus. They cost twice as much, too. Stick with the Switchcraft; they were good enough for Grampaw and they're *still* the best. (I sell both kinds, in case anyone is wondering.) If you want to make a cable that is damn near indestructible, use a piece of 3/8 HST over the inner part of the plug; fill the inner portion with hot-glue and slide the shrink over the glue while it's still hot; it'll begin to shrink immediately. Finish shrinking it with your heat- gun (or a 1000W Par-64 can, or a propane torch set on low, or a cigarette lighter, or a hot-air popcorn popper [all of which I have used successfully in the field]) and wait for it to cool before removing any glue that squished out the edges while you were shrinking it. This is the *best* termination system that I've been able to devise; I have guitar cables in the field that are still going strong after more than a decade of use.
Once you've got your cables, that's it! Plug those puppies in and let 'er rip.
Pedalboard Components
Here's a list of all the ingredients, with links to stores if you're going shopping. Note that the cable-building gear is about twice what I'd need if I wasn't using a loop-based switching system, and even then I had some left over to make a few 10' cables.
Board:
15" x 30" 1/4" plywood
Scotch Heavy Duty All-Weather Duct Tape
Velcro brand Industrial Strength Black Tape, 15' x 2" roll
Cables:
60' of Canare GS6 Instrument Cable
20 1/4" Switchcraft 280 straight plugs
20 1/4" Switchcraft 226 right angle plugs
My Effects
I've linked much of my gear to zZounds.com, which I like to shop at for their rock-bottom prices and quick delivery.
 Ibanez Tube Screamer TS-808 Reissue, modified by Robert Keeley - Most of my guitar heroes use effects that are so obscure or expensive that I'll never own them. But the Tube Screamer is one of those pedals that you see in several pro's signal chains: Steve Ray Vaughn, Carlos Santana, and Trey Anastasio to name a few. Even the cheap TS-9's sound great.
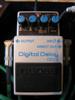 BOSS DD-3 - This was the first effect I owned, back when I was obsessed with U2 and, specifically, The Edge's guitar playing on The Joshua Tree album. Got it under the Christmas tree when I was 16, and spent a couple frustrating weeks trying to sound like The Edge before putting it in storage for 15 years. Now, aside from occasional nostalgic U2 jam sessions, I mostly use it for a slight slap-back effect along with reverb for a spacey, atmospheric sound.
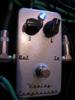
 AnalogMan Sun Lion Fuzz/Booster - This is a boost and a fuzz pedal in one package. I haven't fooled around with the boost much, but the fuzz gives me a great Hendrix tone. Sounds great with my wah.
 Electro-Harmonix Holy Grail Reverb - I had reverb in the old solid-state Fender Deluxe '85 I used in high school, but it sounded so lame I convinced myself that I didn't like reverb. But I recently decided to give in and buy a Holy Grail--the most popular reverb pedal around, and found in many pro's rigs--and now I can't imagine playing without one. One minor bummer was discovering that I can't hook it up to my power supply--the instructions emphatically state that you need to use the accompanying wall wart adapter because of the Holy Grail's unique power requirements. So it takes 10 more seconds to set up and break down my pedalboard. A small price to pay for awesome reverb.
 Dunlop Original Crybaby Wah - I've had this thing since high school. It hasn't weathered the years too well--the tone pot crackles sometimes--but I figure I can just replace it without buying a whole new pedal. Sounds great with my fuzz pedal (when it's not crapping out on me).
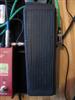
 Ernie Ball Volume Pedal - Solid construction, perfect action, never had a glitch.
 Keeley Compressor - I only started using compression recently, but I love it. It smooths out my sound, and adds sustain and volume when playing quiet, delicate melodies and arpeggios. Very subtle effect when the sustain knob's set to 9:00. The only time I turn it past that is when I want feedback, which I can get at very low volumes when the sustain knob's cranked. A cheaper, and still awesome, compressor is the MXR dyna comp.
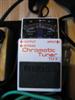 BOSS TU-2 Chromatic Tuner - This is the industry standard, and it works perfectly. One of the great side-effects to having a pedal board is being able to tune quickly. Previously, I couldn't be bothered to add a tuner to my signal chain when I was gigging, and would just tune by ear while onstage. But now the BOSS tuner is a permanent part of my signal chain, with no hassle. I'm in better tune, and the audience and my bandmates are spared the whiney sound of me tuning after every song.
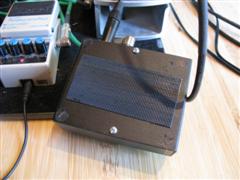
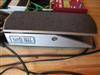
 Rapco AB-100 A/B switch (works OK, but if I could do it over, I'd get the Radial Bigshot because it has true bypass) - Lately I've been using a two-amp system when I've been gigging. This box splits my signal, sending it to both my little Fender Vibro-Champ, which has clear highs, and my Marshall 18 clone, which provides mids and bass. With the amps miked separately and panned into the left and right channels of the PA, I get a huuuge sound.
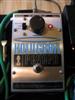
 Voodoo Lab Pedal Power 2 Plus power supply - This wonderful box powers all my pedals except my A/B switch (which has a battery only to light the LED's), and my Holy Grail Reverb, which requires its own power supply. I love it that I don't have to dispose of any more 9V batteries or worry that a battery will die while I'm performing.
 Carl Martin Octa-Switch - This slick piece of Danish engineering has been worth every penny. There are two main benefits to using a switching system. First of all, you can program the eight switches to use any combination of pedals, eliminating the need to stomp on multiple pedals when you switch between your favorite combinations. Secondly, each effect has its own send-return, which means that the guitar signal only passes through the pedal when it's being used. Why does this matter? All pedals suck at least some tone and add noise to your guitar signal when they're not being used, if for no other reason than that they're making the path from your guitar to your amp longer. Try playing your guitar through 50 feet of instrument cable, and you'll see how much of the high's you lose--your amp will sound like it's got a pillow over it. What's worse, many cheap or vintage pedals suck tone like a leech. With a loop-based switching system, your pedals are only part of the signal path when you're using them.
I did quite a bit of poking around, and decided ot go with the Octa-Switch because Carl Martin is a highly respected name in guitar equipment (he was interviewed in a recent Guitar Player article about pedalboards), and the Octa-Switch got accolades in the reviews I read.
 My only concern is that if I were ever to spill something on it, liquid could easily get into the little toggle switches on the top of the unit. Don't use the Octa-Switch if you have a permanent gig at a waterslide park or your fans like to dump a cooler of Gatorade on you after your encore.
Guitars and Amps
1990's-era Fender American Standard Telecaster with a Duncan Antiquity bridge pickup - My favorite guitar. Sparkling tone and a nice feel. Sorry, no photo--it's in California on vacation.
 2000's-era Les Paul 1957 Custom Historic Black Beauty (actually, mine has a cherry finish). Gorgeous, incredible feel, quite heavy. Sounds great distorted through my Marshall, but a little muddy through my Fender. I got it cheap(er) on eBay because it had a big gank in the back of the neck. One person's blemish is another person's mojo.
 1990's Gretsch G6118 Anniversary w/a post-production-installed Bigsby tremolo - Great looks, twangy tone. Awesome feedback.
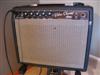 1964 Fender Vibro-Champ - Bought for $400 on eBay. Best music gear purchase ever. These old blackface Fender amps (1964-1967) really do sound amazing. I record with the volume at about 9 for a little crunch.
 Marshall 18-Watt clone - I built this from a kit, and got a lot of guidance from the website 18watt.com. You can read the whole story of building the amp here (start at the bottom).
Have fun building your pedalboard, and let me know how it goes!
Comments 78
Nice job Rob, and thanks for the comment! If you think that YOUR board is ghetto (it's not), I shudder to think what mine would have looked like if I actually picked up some tools. It's good to have a woodworker in the family 🙂
I have always hated the idea of using Velcro and when I priced it, I even wanted it less. The idea of modifying pedals and adding sticky stuff to them did not hit a chord with me. I did a lot of research. I found an old reference to these funiture like fasteners. So I tried to source them when I stumbled across this plumbers strapping. Check out the info on my pedal page. I don't sell anything I am just trying to enlighten you. http://www.guitarandbeyond.com/pedal-board/
Author
Love it. Only drawback I can see: It's a pain unscrewing the pedals to move them or swap them out. But still a great solution. I like the creative use of cheap Ikea shelves too.
Actually, I keep the proper screw driver in my gig bag. It takes seconds to unscrew the pedals. It's not a big deal. When you have classic pedals that are worth money, it's best not to gum them all up with velcro.
Author
Great to hear from you again, Stewart! You're right, it wouldn't really take much effort. Still, after having this pedalboard for 10 years, the only time I've regretted putting velcro on the backs of my pedals is when I want to just use one at a rehearsal or jam session or simple gig, and I'm performing on a hard surface--the pedals scoot too easily. If I had to do it over--I'd still use velcro.
You've got some great ideas about attaching velcro. I gave up on the adhesive and used a staple gun but, my pedal board is 3/4 inch solid pine. Yeah, it's heavy but, in the great scheme of things it's still one of my lightest pieces of equipment. My Ampeg head was always the last thing unloaded from the van and these roadies bench pressed the Voice of the Theater cabinets into the air as they carried it to the stage.
This an awesome post and an awesome resource Rob. This is one of the most professional ghetto board setups I've seen. For my next board (I just made mine a few months ago and am already looking to upgrade) I'm definitely going to tape it down and cut my own cables. I'm also looking in to setting up a switching system.
by the way you have some BEAUTIFUL guitars.
thanks for the post!
For a DIY Pedal board,I used Black Formica for the top,since I used to work at a countertop place,
Than I positioned my pedals where I wanted them,
I permanantly screwed my pedals,to the board,I one by one,removed the bottoms of each effect,& used the right size,drill bits for the holes used,the effects bottom as a guide for the holes,than I'd take each screw,to the hard,ware store,& got longer screws to go into the,1/4,inch ply,just to make sure the,screws I purchased,fit,I brought the effect with me to the hardware,store,the same goes for the crybaby pedal!Than I screwed,from the bottom,of the pedal board I built,each effect 1 by 1,w/room enough for the cords ,& I used a Voodoo lab to power my effects!
nice! my first board is also diy. i covered mine with the speaker carpet (http://us.st12.yimg.com/us.st.yimg.com/I/mobile-emotions_2044_13722446) and use industrial-strength velcro to attach the pedals. it works great!
this is just simply one of the best blogs around. Thanks!
That switching system looks fantastic -- I will have to add it to my Never-ending List of Gear I Crave.
Pingback: Guitar Lifestyle » Build Your Own Pedalboard
cool job, i was thinking of building one all day, going to the garage now!
Nice post. I like the idea of the switcher. One thing you may consider in the future - instead of velcro on the pedalboard try auto interior/trunk fabric. It is ~$10 for enough to make 3 or 4 big pedalboards and the velcro on the pedals sticks to it like glue.
Just wondering about what you did with the crybaby. Mine has little stubby legs and I won't be able to attach it to my board (which I'm in the process of building) with velcro. I'm thinking of drilling holes for the wah stumps although that'll limit where I can put the wah. Any recommendations?
Hey Simon,
I ended up removing the legs (each of mine had a phillips screw attaching it). I flipped the bottom plate, just in case I ever wanted to sell it and didn't want velcro glue marring the bottom. Do your crybaby's legs come off?
Hey Rob,
So glad I stumbled onto your blog as I'm gathering the pieces for my board. I'm ready to make my own soldered cables (love the passion you put into them), but what is this HST tape that lord valve is talking about. Also, I've been hearing a lot of hype about George L cable. What's your opinion? Last, I've been eyeballing the Carl Martin switcher. A couple reviews complained about slight noise when switching. Any truth to this? What a goldmine you've created here. Thanks Rob.
Hey John,
Awesome, thanks for stopping by! HST is heat-shrink tubing. You can find it at Radio Shack, Home Depot, or most hardware stores, I think. I don't have first-hand experience with George L cable, but I hear it's great. I love, love, love my Carl Martin switcher, and haven't had any trouble with noise during switching. There is a really faint click sometimes, but man, you'd have to be playing solo in a silent auditorium for anyone to hear it.
AWESOME post! It's funny.. I was looking into a "DIY" pedalboard of some sort, and came across this site...
Now I'm gonna have to go buy an octoswitch! My wife's anguish thanks you. =)
But, seriously, well-written article! Keep up the great posts!
Great post! This is awesome, I've just recently started expanding my collection of pedals, and a DIY pedalboard is just what I need - why should I be spending as much on a pedalboard as I did on the pedals themselves?
Quick question though, and this is probably just me being paranoid, but was there enough velcro in that one roll for the whole board? The square footage doesn't measure out, and I was planning on getting the supplies today or tomorrow.
Thanks Rob, and keep up the awesome blog!
Oh also, sweet Vibro-Champ....
Good question Mark--I did buy two rolls. Used just a small part of the second roll.
Hope this info gets to you in time (I'm sure you figured it out anyway).
Glad you found the article helpful--
Rob
Rob,
I was just chatting with wryanturner today about making my own cables for when I "double" on bass guitar and upright bass. He suggested that I call you to learn about soldering, and (lo and behold) you've got a great post on tons of useful information (including a link to a bulk distributor of Canare cable!)
Thanks for the awesome blog! I will be back for more!
Pam
Thanks a million for the tips on the pedal board. It is extremely useful. Continue the good work for all those that need and don't have the know how!
Awesome, very informative. I was wondering if anyone can help me w/ setting up a pedalboard configuration. My effects consist of: Boss: Tu-2 tuner, v-wah, GE-7 eq, BF-3 flanger, CE-3 chorus, Noise Suppressor. MXR pedals: CAE MC-402 od/boost, Pase 90, Blue Box, Carbon Copy Analog Delay. If anyone has a suggestion for the optimum set-up?
I will be using a Will Sledge 4 loop pedal strip w/ a Tuner out switch. Any suggestions? Thanks everyone.
What kind of case do you use to carry this homemade board around?
C
No case, Colin. I don't gig often--if I did, I'd want more to protect my pedals. As it is, I just put the board on the back seat where it won't get hammered by a toppling amp.
Hey there Rob, great article. I am a young guitarist and i am starting to build my pedal collection and i just had a couple of questions for you. 1 would you reccomend the boss DD-3 over all the other boss models, and to other compeditors eg MXR Carbon copy. Also would you reccomend carpet ontop of the ply wood? im just wondering as i plan to start building right after exams, cheers. Kelly
Hey Kelly,
Glad you dug the article! I know a lot of guitarists use carpet--I've never tried it. And likewise for the delay pedals: the DD-3 is all I know. Maybe someone else here has any recommendations?
Have fun,
Rob
Saw your Cherry Marshall 18watt at the bottom of your page. Do you know if Weber will still make this w/o the tolex?
I don't know, Jim. It's pretty, isn't it? I think that cherry might be rather brittle. The thin back panel on mine has a 1-inch crack coming from a screw hole. Other than that, it's fine, though.
Rob
Is it REALLY essential to remove the rubber from the base of the pedals?
Maybe not. That velcro I got was super-sticky--maybe it'd stick to the rubber.
Hi Rob, Great article! I plan to start making my pedal board in a couple of weeks and this was just what I was looking for! Just a quick note, even though it might pain you, if you drill a small hole right in the end of the crack on your Cherry Marshall then it will stop the crack propagating any further. They used to do this on shot up planes in the war to stop them falling apart!
Dan
What a great idea, Dan. Thank you!
Hey, this is a great guide, thanks a lot for it. Instead of removing the rubber from the bottom, could you just stick duct tape to the bottoms of the pedals?
Rob,
I just finished my pedal board using your guidance. I think I made it too big, but I guess it's better to have too much space than not enough.
I suppose I just need to buy more pedals to fill the space.
You can see mine here: http://ronhostetter.com.
Thanks again. Great Post!
Ron
THANKS FOR THE INPUT ROB, I HAVE SOME PEDALS THAT I WANT TO MAKE A BOARD FOR. I HAVE MY OWN SINATURE DANO FAB METAL,
BOSS MD-2 MEGA DISTORTION,SIGNATURE FAB CHORUS,IBANEZ FL-9 VINTAGE REISSUE,A DOD FX69B GRUNGE,BEHRINGER FX-600,AND A DANO PB&J TWO STAGE DELAY. I WANT TO MAKE A CUSTOM PEDALBOARD FOR THOSE 7 PEDALS SO THIS ARTICLE WAS AWESOME. THANK YOU....
"digital age hobo". "about as much fun as putting down a lame horse". Your F'in funny Rob! Good info too.
🙂
Kudos, you've been very helpful. Any tips on what pedals will give me a more brutal, metalcore sound?
I like the Boss Metal Core ML-2. It does Metallica justice.
What he said about sanding the wood to make sure it's smooth (so that the velcro will stick) is very true. If you're not into the whole sanding by hand (as it's tedious and time consuming), you can use a DA sander. Chances are, someone you know has a DA sander, and it does a terrific, consistent job in 5 minutes of sanding.
I didn't finish reading all of the article but it did have a lot of great info. One thing I was unaware of is the "pedal order". I didn't know that a different location on the line up would reduce some unwanted issues. Thanks dude.
Great info for the board and the cable components! Making mine today. Awesome trick with the glue too! BTW look into making your own aby switcher. sooooooo easy and inexpensive!
"So the following are instructions for building an awesome, pro-quality switch-system pedalboard, using the best materials and
construction with the least amount of effort."
sure, let's see...
"I covered only the bottom and edges of the pedalboard with duct tape"
so he was planning to use the best materials and resorts to duct tape?
"I took a risk and got Velcro-brand Industrial Strength that came in a 15' x 2" roll. My worry was unfounded. This stuff uses the same
adhesive that Peter Parker has in his spider web formula. It’s never coming off."
yeah right - wait till the room temperature reaches +28 C, and watch the pedals fall off the board!
"See, in order to attach the “hook” velcro to your pedals, you’ve got to peel the rubber off their base. I know I’m a sentimental sap, but
it was tough ripping apart the BOSS DD-3 I’d gotten for my 16th Christmas"
What kind of brutal massacre is that? Doesn't he realize that he's destroying his pedals, yet calls himself a "sentimental sap"? Ripping
off the rubber base of a pedal destroys it completely and won't be worth a penny afterwards!
"The more time-consuming way is to solder (audio cables) your own. After a lot of poking around, I went with the advice of a fella named
Lord Valve, mostly because of his name, and because he recommended using hot glue, which is almost as much fun as duct tape. Soldering all
the cables for my board took about 12 hours, but it was fun knowing I was probably making the most awesome patch cables in the universe."
HOT GLUE TO SOLDER AUDIO CABLES..........
yeah buddy, you really got the most awesome junk in the universe
Ha ha ha! Thanks for your evaluation, DR. But after a year and a half with my pedal board, I still contend it kicks ass. Here's my response:
1) Duct tape
Duct tape is a fantastic material. It's held up beautifully. What self-respecting male would dis duct tape?! Incidentally, by "best materials and construction with the least amount of effort," I meant best materials POSSIBLE without having to exert much effort. Duct tape as a plywood covering totally fit the bill.
2) Velcro Adhesive
I can't say I've played in an 80F room, but the Velcro's stuck to the plywood like a case of pneumonia.
3) Destroying Pedals Completely by Removing the Rubber Base
This may come as a shock, but they still work without their rubber base.
4) Building Cables
The cables are soldered, then the connection is encased in hot glue before adding HST (heat shrink tubing). You could tow a trailer with these cables and they'd still work.
That's a very cool way to protect your solder connections. Another dude used that method when he built his amps. Dumble! And those suckers keep right on rockin' forever. GREAT article and I appreciated the tips!
Author
Dumble amps are made that way? Well, that's cool.
I have two peddles a dd-3 and an oc-3 i want to get an emx bass balls and a boss tu 3, should i have them in a specific order.
This was a phenominal article. I appreciate all the detail including the link that discusses which pedal and effects should go in which order and why. I have never really been confident in this area. I have never heard it explained as simply or as concisely. Thanks for the tip.
For those who cringe at the idea of velcro being stuck on their pedals, I have the answer: Cable ties. I have a two tier pedal board made of pine. I drill two holes in the wood on either side of the pedal, then run a cable tie (the plastic kind that are permanently locked once you tighten them) around the stompbox. I use a lot of Boss pedals, and they are the hardest, but still work. I run one tie around the middle of the pedal, and one goes around the little lip of the box just under the footswitch...run at an angle down to that lip from holes in the board an inch north of that end. They stay on great. The ties are cheap...just cut them when you need to move things and replace them. I used high quality velcro, but if you move your pedals around from time to time, it wears out. Maybe larger sections of velcro are better...I used 1" strips of the high quality stuff you can buy online. But I like this method better.
If anyone wants pictures, feel free to e-mail me. I came to your site because I am researching effects pedal switching options like the Octaswitch.
Cool! Thanks for this! I have a pretty large pedal board that my dad gave me (NYC) which I am really happy with....Sometimes I just don't need 10 pedals! So, I've been thinking about trying to build something a bit smaller when 3 pedals will do.
I recently built two pedalboards of my own. I used particle board because it was easy to work with and it doesn't flake as much as plywood.
The first board is tiered with the distortions raised and in the back with modulation and time effects on the lower front. The wah is on the same level as the mods but on the side of the whole thing.
The second board has a single level with several pedals.
I use a power supply.
Thanks for posting this. I finished my pedal board last night (soldering all the patch cables), and it was such a huge relief to switch it on and have it actually work.
Stuff I did: I used pedal-sized rectangles cut out of cardboard to figure out the size and layout of the board, so that I could include pedals I was planning to buy. I painted the top of the board with black chalkboard paint so I could draw the layout on it with chalk. Also, used a 3/4" hole saw to make a handle, by drilling out 4 overlapping concentric circles... Surprisingly ergonomic, and helpful for initially lifting the board off the floor. (I used MDF for my board, not sure if this would work as well for plywood.)
This all looks pretty great. The whole reason I've been wary of building my own pedalboards is because I did not like the idea of having a permanent set-up... but velcro fixes that problem nicely. Will certainly give it a shot!
This is a fantastic article! Thanks so much for the info. I'm in the process of making my own pedalboard from an American Premium gun case I bought from a yard sale for $5. Right now, I only have two pedals but this article has really taught me a lot!
Thanks for the great page! I just made my board this weekend. Jeez, 10 years of playing without one, I wonder why I never got around to doing this. It was much easier than I thought it would be. Cheers to you!
Thanks for this- very useful indeed. The tolex idea is good. Recently used a sort of leatherette from a hobbis/craft shop for a board rebuild based on your idea. Looks good.
I've used velcro for my FX for a long time. BUT I put the hooks on the board and the loops onto the pedals, because I sometimes play in a set up which doesn't warrant taking the whole board out, and it just feels less 'scrunchy' to put pedal with the velvety loops straight onto the floor rather than the stiffer hooks.
Recently rebuilt the board I use for my fiddle, traded in old DOD FX and got some Boss ones (Octave-Flange-Delay) and tried using little brackets that screw to the pedal at each corner, and to the board. Then realised I had painted myself into a corner- couldn't unplug the patch leads, and certainly couldn't remove a pedal or two to use with my electric guitar. Back to velcro for the Mark 2 version!
Great post mate, i've built mine pretty much to the letter although its much smaller and as such doesn't need the octa-switch. To answer a question above i used the same Velcro brand heavy duty hook and loop and only stuck the hook side in strips to the rubber on the bottom of my pedals (EH Small Clone, Marshall EH-1 and a Boss DS-1) and i can hold the board upside down and shake it and there is no sign of movement at all. In fact the Small Clone only has 4 small squares of tape stuck to the feet and i dont think it would move in an earthquake!
The one thing i had trouble with was sourcing a power supply, there are quite a few out there and they do seem to vary wildly in both price and quality. In the end i was set on the diago powerstation but was struggling to justify the £60+ price tag (especially as the EH needed a 3.5mm jack adapter which was another £5) when i saw a mention of the 1spot Combo pack in a review. It was half the price (£30 excluding delivery) and came with an 8 way daisy chain and 5 adapters including the one i needed and i have to say i cant fault it. Its not flashy, takes up no space on the board and was cheap compared to some others out there!
Hope this helps others out there having the same dilemma.
Happy building!
Two thumbs up here man!!! Really, nice guide you got there. Well, having a pedal board is really essential in producing convenience on making your tones. Basically, this said it all.
Cheers!!!
Hey Rob, this is one of the best tutorials I've ever read on pedal boards! I'm just about to build a second board and so your advice will help make a better one. The advice on plugs and cables is very much appreciated.
Both of mine are/will be actually made using aluminium painter's platforms instead of wood, though. And I'm awaiting the arrival of the Carl Martin Combinator 2, which is like the Carl Martin Octa-Switch.
And a new website to help with the layout of your pedals can be found at http://www.effectslounge.com/
Cheers!
Is your Voodoo powering your Crybaby? The cables don't seem to work 🙁
Author
Nope, I believe I had to power the crybaby with a 9V. Since I wrote this article I switched to a Vox wah, and it connects to the Voodoo fine.
First of all, thanks so much for posting this, it has been a huge help. I am about to build my board, and instead of buying a power source (I'm 16 years old and broke), I'm going to put velcro on a power strip, and just plug the AC adapters from the pedals into the strip. Do you see any problems with this?
Thanks,
Jack
Author
Nothing that I can see, except that it takes up a lot more room. Have fun!
Great post! Quick question though regarding the power supply. Most of my pedals require DC power which would work fine with the Voodoo Lab brick but my multi-effects pedal and wah pedal require AC current. Are there any good bricks you know of that can output both DC and AC current? If not, are there any other solutions to this besides just having another plug in?
Thanks a lot,
Myles
Author
Sorry, I don't Myles. Anyone else know?
I use a visual sound pedal power, it can use both, and you can power eight effects off it. It even ones that only work with 9v batteries. It's pretty cheap too.
I have a Boss DD20, it's precise, I put the MXR Carbon Copy right next to it because it's not, it's organic and very trippy. It makes you feel like your guitar tone is t
Do pedalboard with 90x50x12 is too big? I planned to put my effects in a good order and didn't eat much space on stage. One more is I have problem in sticking the velcro to my effects. For example, how can I stick the velcro into my MXR 90 phaser? But I don't want to ruin my effect's surface.
Author
Hey Donnie,
I say, the pedalboard is too big if you have trouble carrying it. Try cutting out a piece of cardboard that big, imagine it's 30 pounds, and consider how you'd lug it to a gig.
And about velcro--if you don't want to rip off the rubber on the bottom of your effects pedal, you can use straps to hold them down. I haven't done this, however. I can say I haven't regretted the move to velcro.
Rob
After doing some research on this, your article was the most comprehensive I could find. I couldn't afford the switching system when I did my own, so I guess I`ll be doing the pedal dance for a while yet.
Rob, this is a GREAT write-up! The information is very useful and your sense of humor makes it the BEST pedalboard article I've read! Thanks for taking the time and providing inspiration to take on this "little" project. I don't have many pedals (yet) but knowing what I "might" want to add in the future will sure help with the planning. Long live rock!
Your board design is ideal for what you use at for. Not getto at all. I am in the process of piecing together my own board. I went with making my own switching pedal. This pedal has a A/B (clean/dirty) channel select with 3 other loops that are all true bypass and a tuner/mute out. This pedal works a dream. You can see this pedal in its early stages on Youtube. Search for "DIY A/B Looper 3 channel looper". I need to put an updated video on as this was videoed in the early days. I think the best thing about making your own board is truly that, it is a one of a kind. Everybody should attempt their own board and give the digital all in ones the toss.
brilliant stuff , I have just started rehearsing with my old band a fter a 20 year lay off , was using a korg toneworks in my home studio , tried it live , garrbage , so now using a laney valve amp and knocking up an "emergency pedalboard" your article gave some great tips , cheers ,
Thanks for the instructions, I've only got three pedals now, but this is going to be a huge help in the future.
Great stuff!
I'll add some useful info for you, and anyone else that might find it helpful.
1. Instead of attaching the pedals to the boards with Velcro-use bicycle chain links. Yes! You crack them apart, and screw them to the bottom of each pedal and then to the board. It's more permanent, and you won't worry about pedals coming loose.
2. For those that don't have the bacon to peel off for the switching system , you can build your own. Or, switching systems similar. Beavis Audio has great tutorials! I've built the effects order switch and a 5 channel effects loop with muted tuner out. It's also true bypass. It cost about $30.00 to make.
Hope that helps...
Author
Very cool, Rob. Thanks so much for these tips. For what it's worth, the velcro I use is so bomber the only problem is prying those pedals off when I want to reorganize things. A homemade switching system? Super cool!
Rob